After much research and hemming and hawing about how to heat our tiny 100sf “guest cottage” on our property, I eventually landed on a tiny wood stove. More on alternatives, why you might want one, and why I chose the Cubic Mini in a future post. Let’s get down to the installation.
Before getting into the details it is important to mention that these stoves are not certified and not intended for residential use. Installing one in your home would be a code violation and you would likely have no insurance coverage in the event of a fire. Even if you are putting this in a tiny house, outbuilding, sailboat, etc., you really need to make sure you know what you’re doing because an improperly installed wood stove is a serious fire hazard. Do your homework and be certain you understand and implement the safety considerations, including keeping a fire extinguisher near the stove and regularly sweeping your chimney.
At the time I purchased, Cubic Mini had a much more limited product catalog and informational resources. One could purchase a stove, some mounting brackets, 3″ double walled pipe, and some accessories, but there are some other items necessary to safely to install a wood stove. So before purchasing, I emailed them this question: “Do you have a product recommendation for exiting your 3” pipe through a pitched roof safely and correctly? I found some products designed for a sailboat or other flat roof application but I’m having a hard time finding chimney caps, flashing and collars designed for 3” pipe.”
I received a response with some suggestions for products and the following tips (lightly edited by me):
- The top of the chimney pipe must surpass the highest point of the roof by one foot.
- Where the pipe exits, material must be pulled back in the ceiling and roof area, and a larger diameter hole must be made to offer an air gap between the pipe and the roof. A 1.5-2” gap is suggested If the roof is thick (more than 2”) you should insert a larger diameter pipe to offer extra shielding.
- Fix pipes together at seam with screws
- If you have an attic or a space between the ceiling and the roof, you must use a box to protect that area.
- Most if not all flue pipe caps have spark arrestors. A spark cannot go through anything that is spaced a ½” or less
- Flue flashing must be present the entire run of the pipe if wall mounted. Or if the pipe is less than 9” from the wall.
- If the roof is pitched the hole must be made oval to offer an even air gap all around.
- The boot can accommodate any ribs or bumps the roof may have. And it is made for metal roofs, if the roof is shingled a different boot will have to be used.
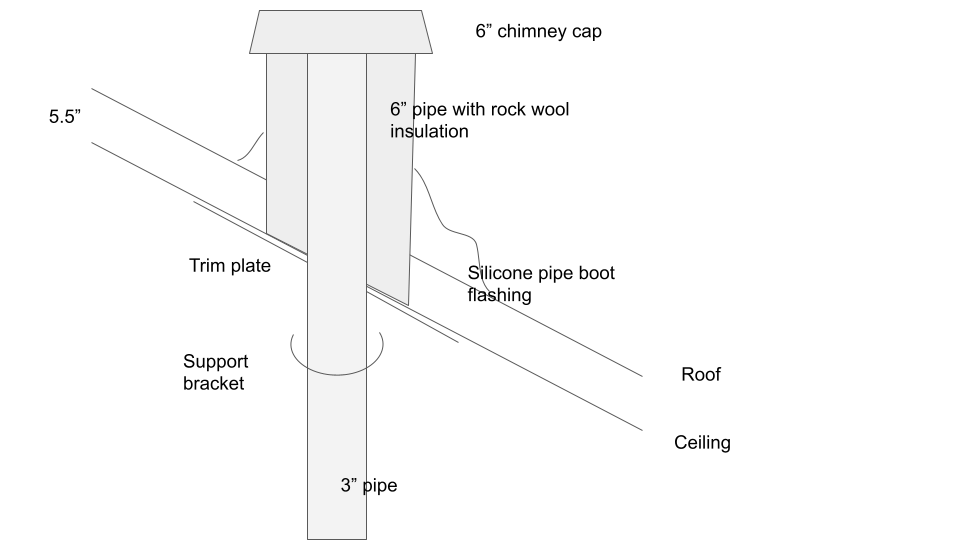
They also provided a product suggestion for the pipe boot (aka roof boot aka flashing) that would work for a pitched roof and chimney cap, and some info on how to create a trim plate to cover the ceiling hole, which was helpful. I also knew that I was going to need to make my own insulated 6″ chimney pipe since I would need to run the 3″ double wall stove pipe into a larger diameter pipe. I considered all of this and mocked up this diagram which I sent back to Cubic Mini to make sure I was understanding.
Cubic Mini wrote back in the affirmative, I pulled the trigger on the purchase on their very reasonably priced products, and a short time later I had the stove, wall mounting bracket, and a few sections of 3″ double walled pipe. I also ordered all the other products I needed to complete the installation, including:
- chimney cap
- 6″ round galvanized duct pipe
- high temp silicon sealant
- a high temp silicon pipe boot flashing
- ceramic insulation rated to 2400F, which is overkill
This was back in November 2018 and Cubic Mini has since made installation a lot easier, by selling many of these components directly. Considering how much time I had to put in to figure this out and source these products from various suppliers, I would have happily just ordered this stuff directly from them.
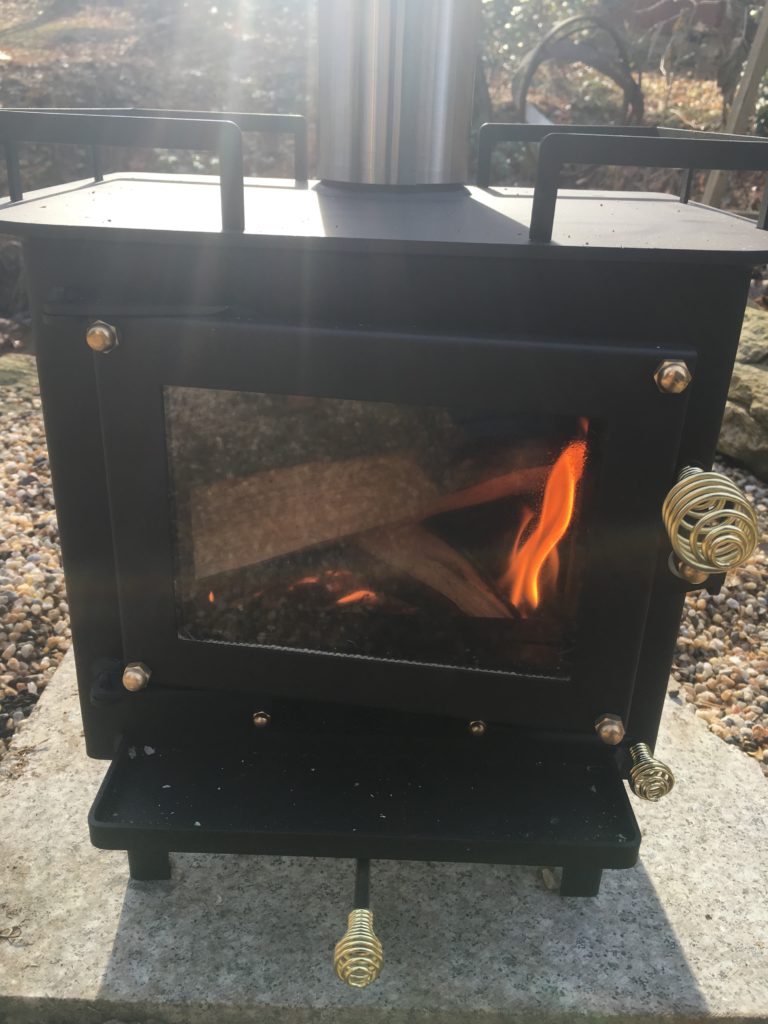
The first thing I did upon receiving the stove was a recommended test burn to help cure the paint.
A week or so later I took a Friday off work to do the installation. This was somehow both easier and harder than I thought it would be. First of all, it ended up being a sub-freezing day with overnight sleet/snow that made for some less than optimal conditions, particularly the dangerously slick roof. If I had been more on it, we would have installed well in advance of winter, but now that the cold season was on us I wanted to make sure I had some heat in the little cottage for the winter and schedules being what they are this was the best shot for getting the job done, weather be dammed. Fortunately I didn’t need to get up on the roof right away, so I hoped enough sun would shine through to melt the icy roof.
I started off by taking a bunch of precise measurements and marking up the installation. Then I proceeded to install the wall bracket, which is neat feature of the cubic mini since the air gap behind it allows for very tight clearance to the wall, which is huge in a small space. I ended up using toggle bolts to secure the bracket to the wall. The spacers were necessary to keep the wall bracket firm against the wall. I used some painters tape to hold them against the backside of the wall bracket until they were pressed against the wall and held in place. Once the fasteners were partially sunk I was able to slip a hand behind the bracket to remove the tape. I considered using cleats instead, but that didn’t seem like a good idea since wood is combustible and they would also block airflow. I’m not sure how else people approach this, but this worked fine, if a bit finicky trying to keep the spacers from sliding off while getting the bracket in place.
Wall bracket install complete.
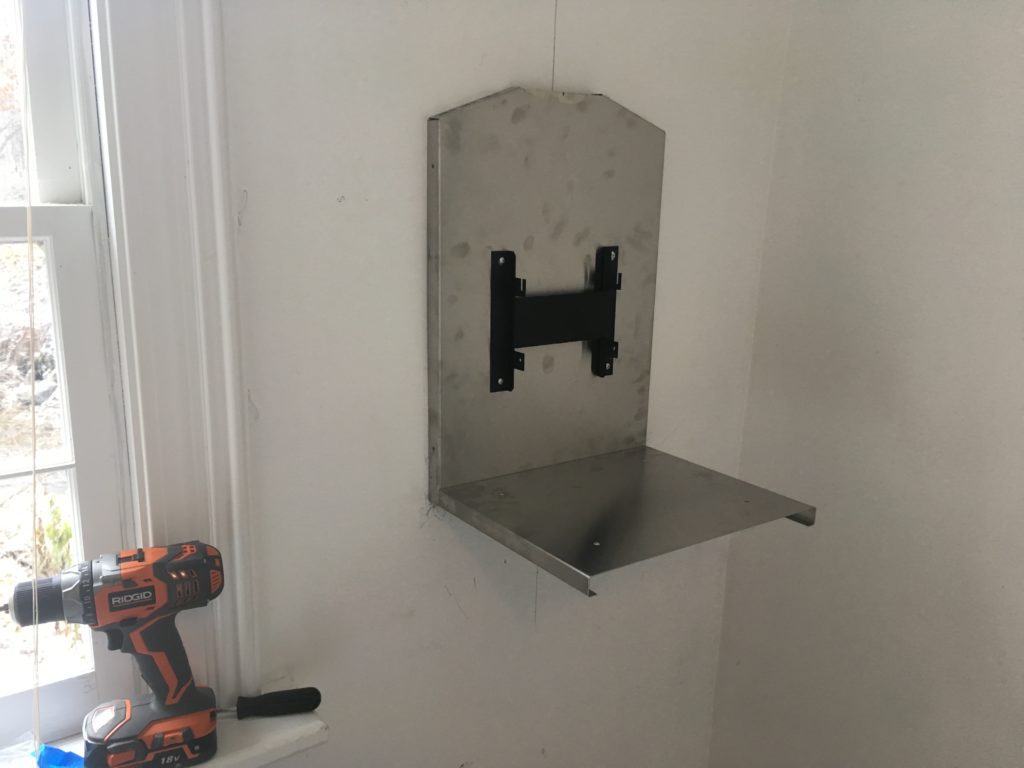
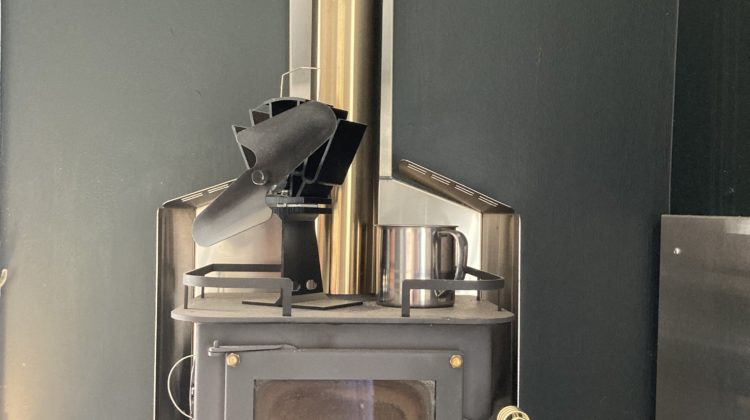
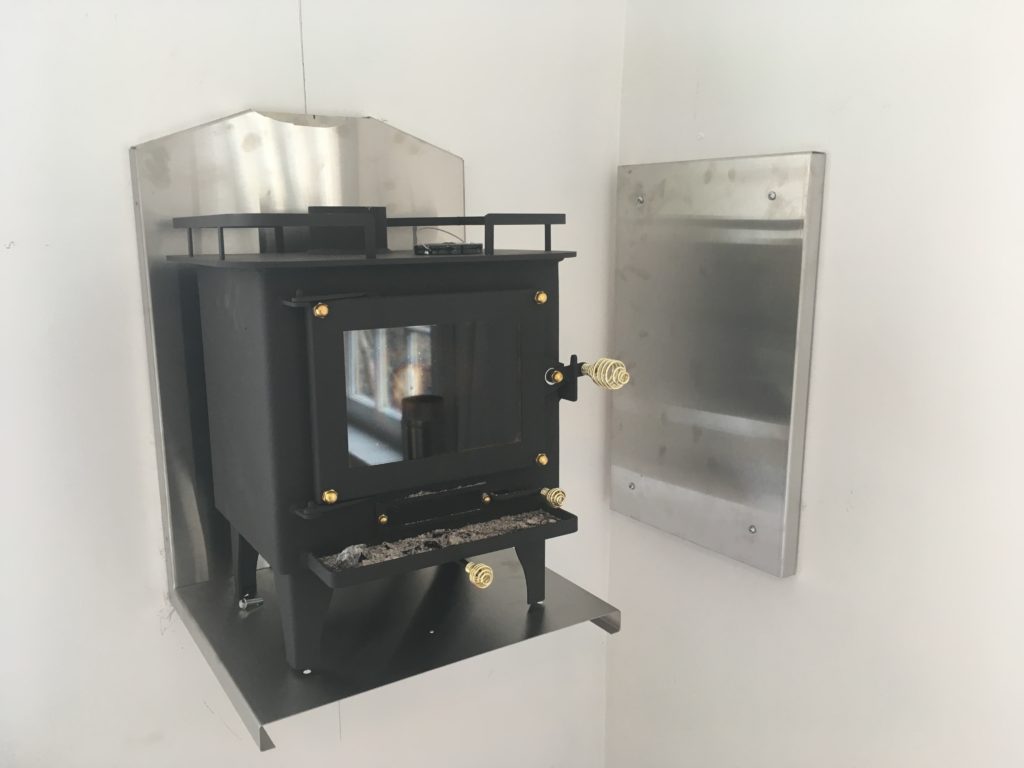
I also installed a side panel to reduce clearances for the corner installation I was doing. And then the stove gets secured to the wall bracket and you’re done with the easy part.
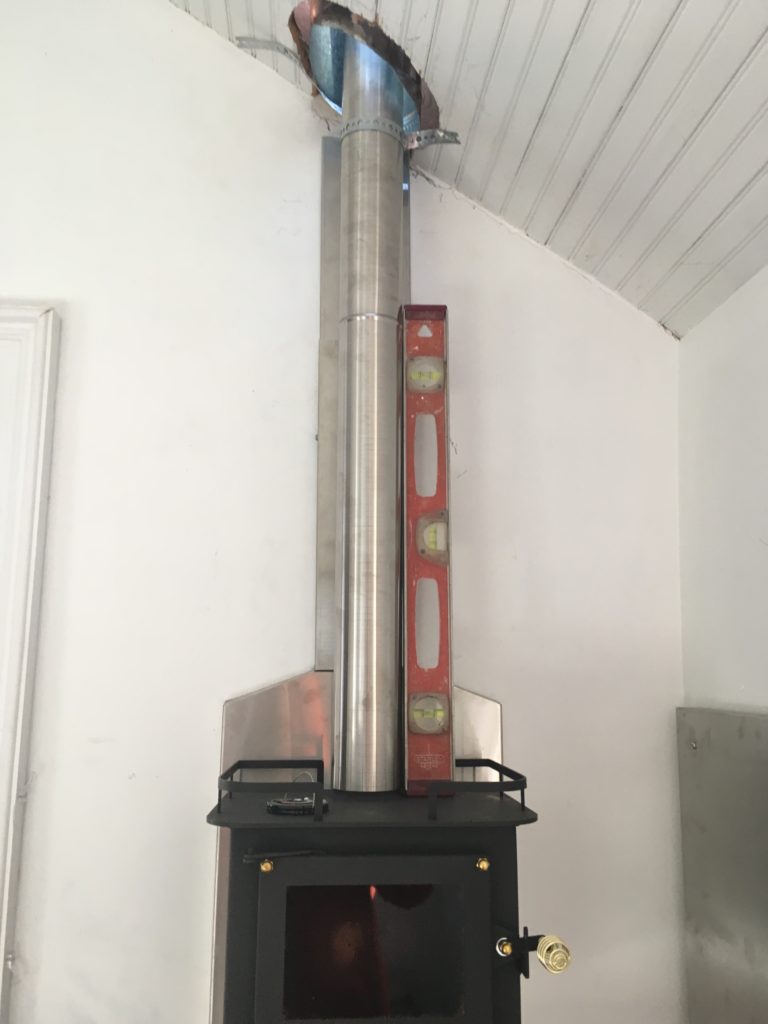
I marked center on the stove flue exit and then used a level to vertically align the point where the flue would exit the ceiling.
I then measured the distance from the wall to the center point of the stove flue exit and transferred that distance to the ceiling, which would be the center of the 3″ chimney pipe once installed. And then I found myself doing one of those things I never thought I would do – cutting a hole in my ceiling.
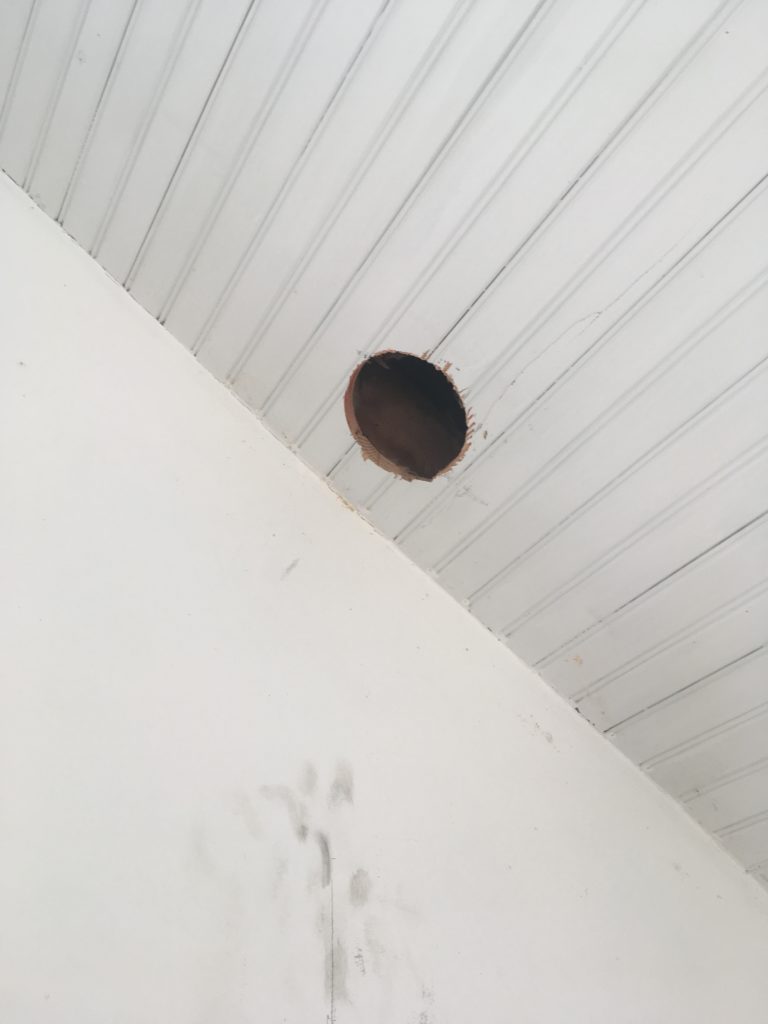
Because of the pitch in the roof, I knew that I would need to cut more of an oval shape than a circle, but I didn’t want to over do it, so I started with a hole that wasn’t much bigger than the 3″ pipe. Then I got up on a ladder, cut away some insulation so I could get at the underside of the roof, and then drilled a hole through the approximate center until daylight streamed in from above.
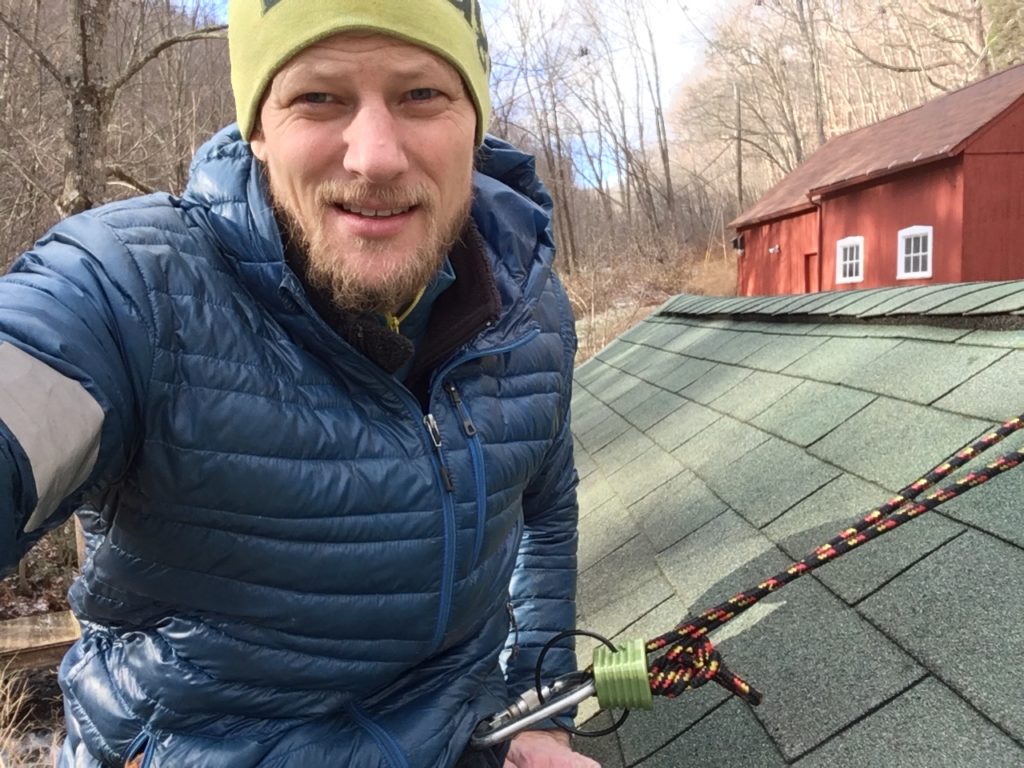
It was at this point that getting up on the roof became necessary. I got out my climbing gear, rarely used since my early 20s, and climbed on up. Fortunately, the sun had melted the ice off the south side of the roof, but there was still a bit of sketchiness scrambling up the north side. I sort of had to leap for the ridge and then pull myself over to the south side, which is where the chimney would go.
I removed some shingling where my drill had penetrated through and then gradually cut a small hole through the roof sheathing.
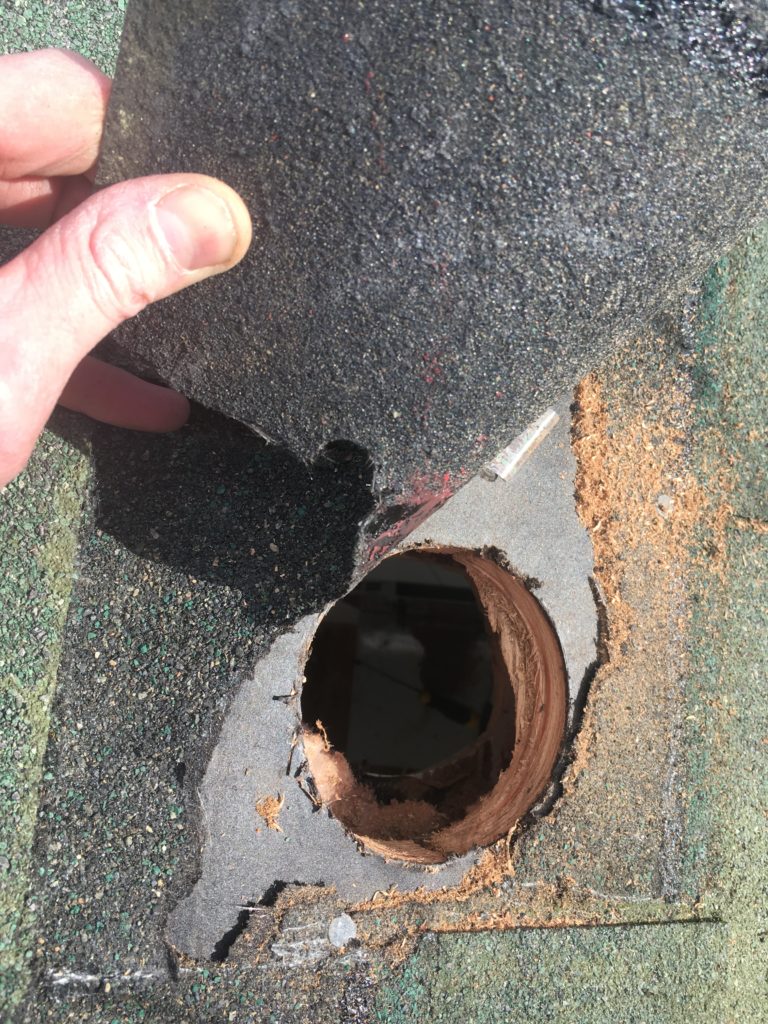
I ended up going up and down from the roof a few different times enlarging both holes a little at a time until I could get both the 6″ pipe properly centered and plumb. This was pretty tedious as getting up and down from a roof in winter is not something you want to be doing a lot of. Actually, there was one more bit of unpleasantness that I’ll mention. I had initially bought a length of 6″ galvanized duct from Lowes. These come in flat sheets with little tabs on them and you form the pipe by rolling the sheet onto itself and locking the tabs in place. But the sheet I bought had been poorly machined so that tabs wouldn’t hold even after I spent a bunch of time prying and manipulating them. I looked on Lowe’s website after 30 minutes of frustration trying to get the damn pipe to remain in pipe shape and discovered that many, many other people had the same problem. Super annoying because not only was I out a few bucks (I had already cut the pipe down to size when it was still a flat sheet, so it couldn’t be returned), but now I needed to go track down some more pipe as quickly as possible since I needed/wanted to get this job done today! So I scurried off to my local hardware store, Washington Supply Company (awesome place!), and to get a replacement. Unfortunately they only had 6″ round galvanized pipe in stock in 2 foot lengths, which meant that I would have visible seams in my “chimney.” I didn’t feel like burning 90 minutes on a Home Depot or Lowes trip so I purchased three 2 foot lengths and got back to the task at hand.
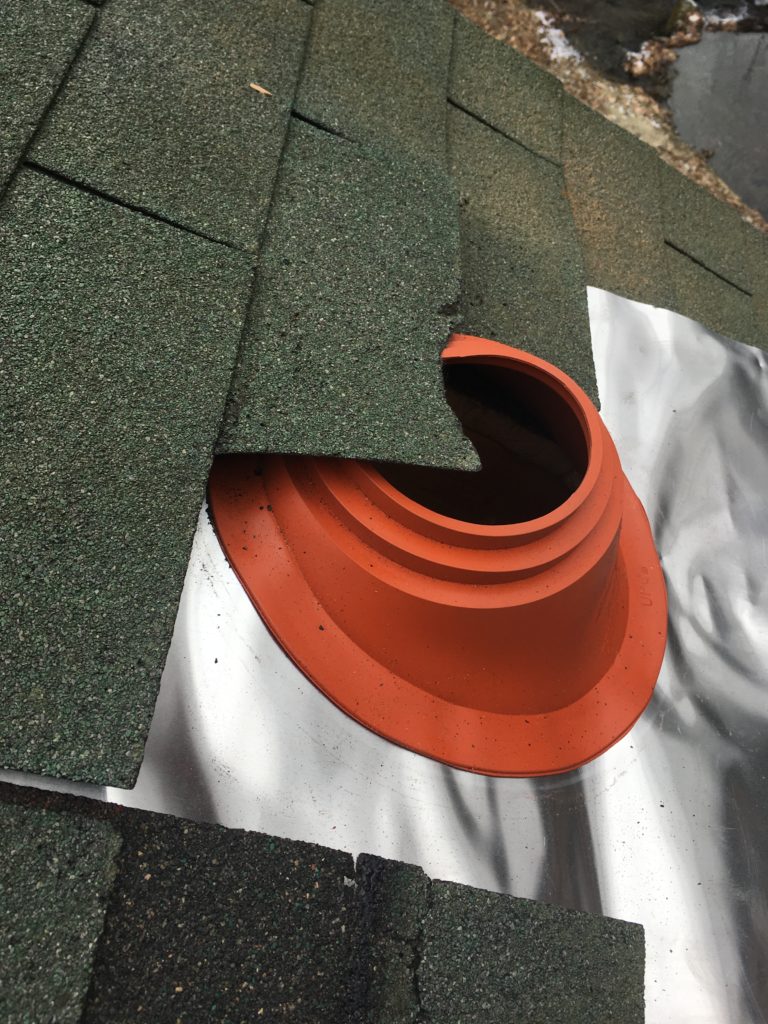
Next I prepped the chimney pipe boot, which involved cutting it to the appropriate size to form a watertight fit around the circumference of the chimney pipe.
I first did a “dry fit” of the 3″ pipe running up through the as yet uninsulated 6″ pipe and checked for plumb.
Then I wrapped the 3″ pipe in the ceramic insulation, holding it in place using some stainless steel wire, slid it into the 6″ pipe, and the slid the 6″ pipe into the pipe boot so that approximately the right length of pipe protruded from either end, and then hauled the whole thing up on the roof so that I could drop it in through the top and then fasten the pipe boot flashing to the roof deck. I used roofing nails where the flashing tucked under shingles and roofing screws with little gaskets on the rest of the flashing. I then did a very unprofessional job of sealing everything up with the high temp silicon sealant. That stuff is incredibly difficult to work with, especially when it is cold out. In fact, I was trying to apply it about 15 degrees below the minimum operating temp, so I needed to take the cartridge inside to heat up before I could even get it to flow.
I had a random box of red shingles from the barn roof, and no green shingles, so I ended up using two red shingles as a hacked together fix for some that had broken off getting the roof holes cut. I also had a really hard time finding chimney stays for sale, so I used galvanized strapping as a temporary solution. Three years later, they’re still there.
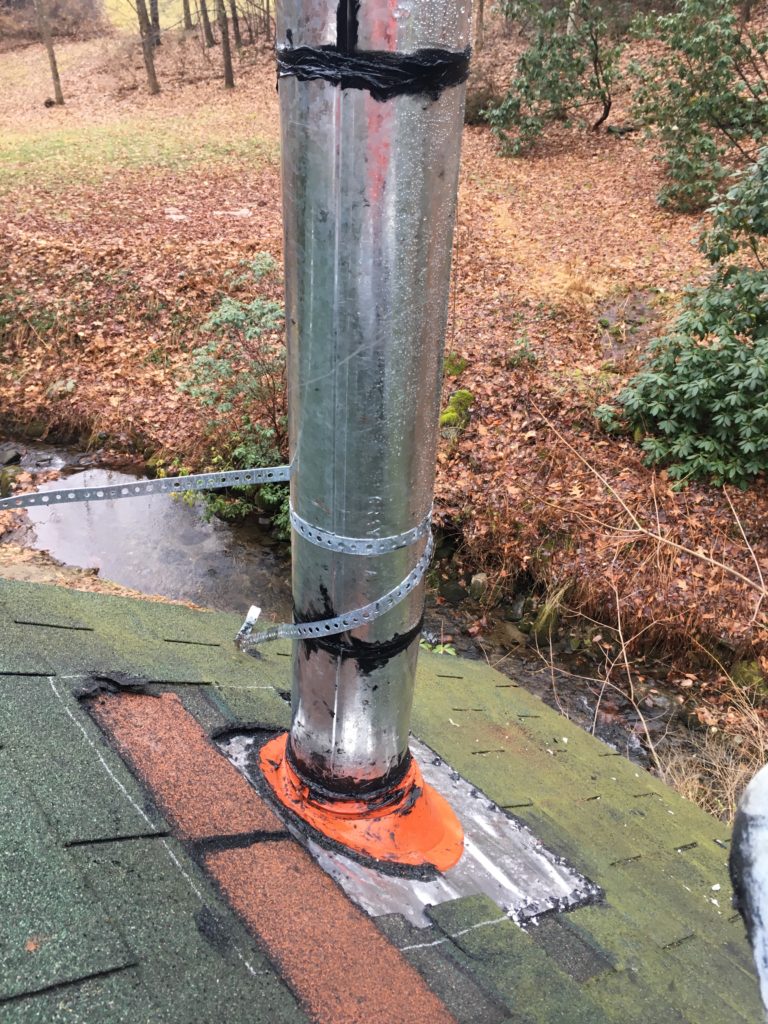
I had to caulk the pipe seems because the pipe was assembled “upside-down” and I didn’t want to reinstall it. What I mean by “upside-down” is that the female end was facing up and the male end was facing down which resulted in a sizable gap that water could work its way into. This was a mixup more than a mistake. Chimney pipe should be installed this way so that creosote will fall down into the stove instead of possibly getting trapped in the seam between two pipe joints. But I was using this galvanized ducting more as a protective shield for the ceramic insulation around the actual double-walled chimney pipe, so it wasn’t necessary to install it female end up and doing so made for a mistake with no easy solution other than redoing the whole assembly, which I just couldn’t bring myself to do when a much simpler fix was at hand. I suppose caulking the seams does detract from the look of the nice shiny pipe, but the chimney isn’t a visibly prominent place.
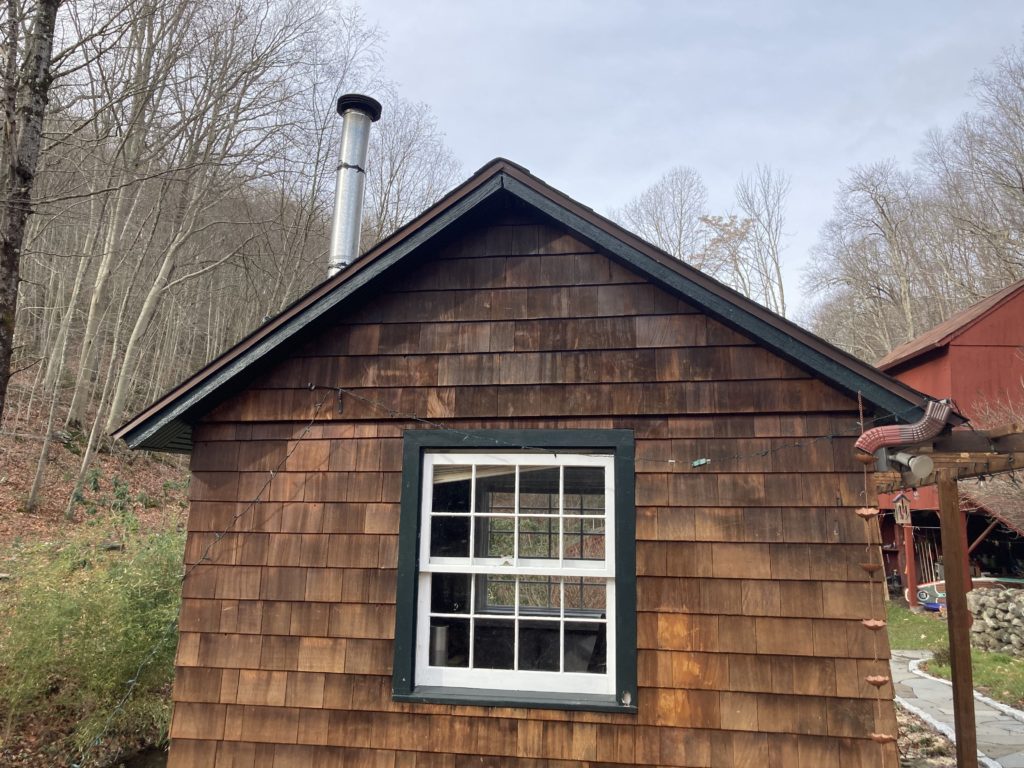
Here is another view of the chimney. It is worth noting that the Cubic Mini guys advised that the chimney height should be at least one foot above the roof ridge, but an installation to code would be 3 feet, so I went with the latter and as an additional safety measure.
To wrap up, this was a tough job that didn’t need to be so tough. Being on a roof on a cold winter day is just not a lot of fun. I was incredibly sore and beaten down by the time the job was done. I also stupidly bare handed the ceramic insulation and made a colossal mess caulking, mainly because I was too stupid to consider the working temperature range of the product, which resulted in this:
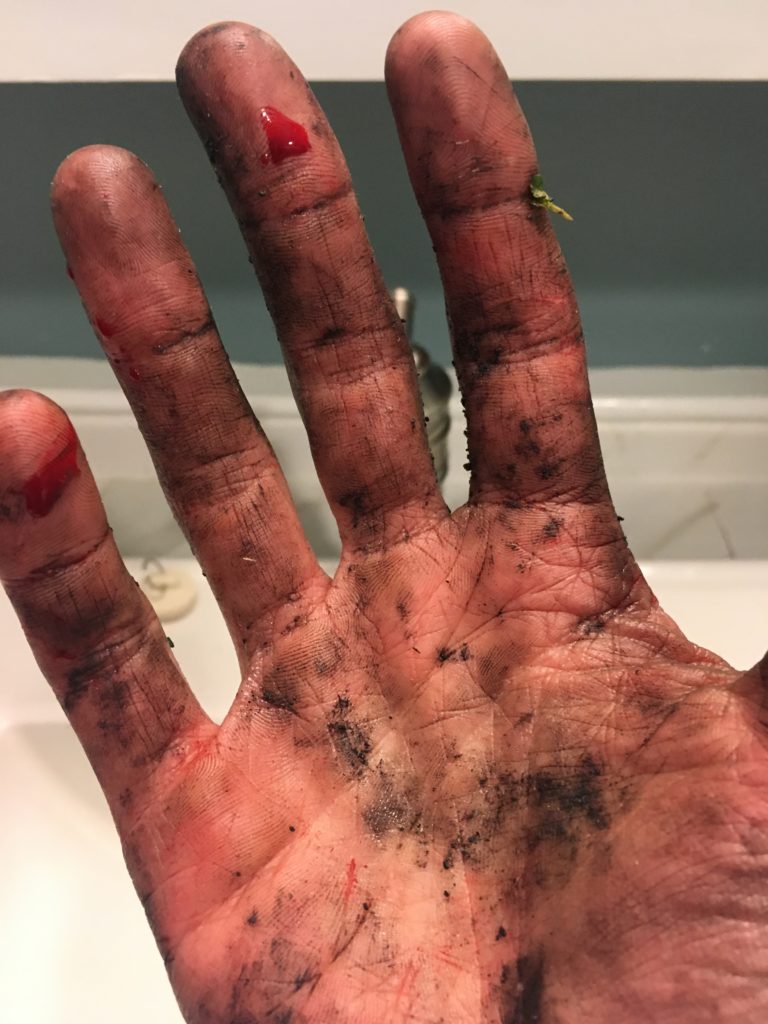
There are hundreds of tiny cuts, made all the more painful by the fact that I needed some heavy duty cleaning agent to remove the caulking. It took a few days before my hands were back to normal.
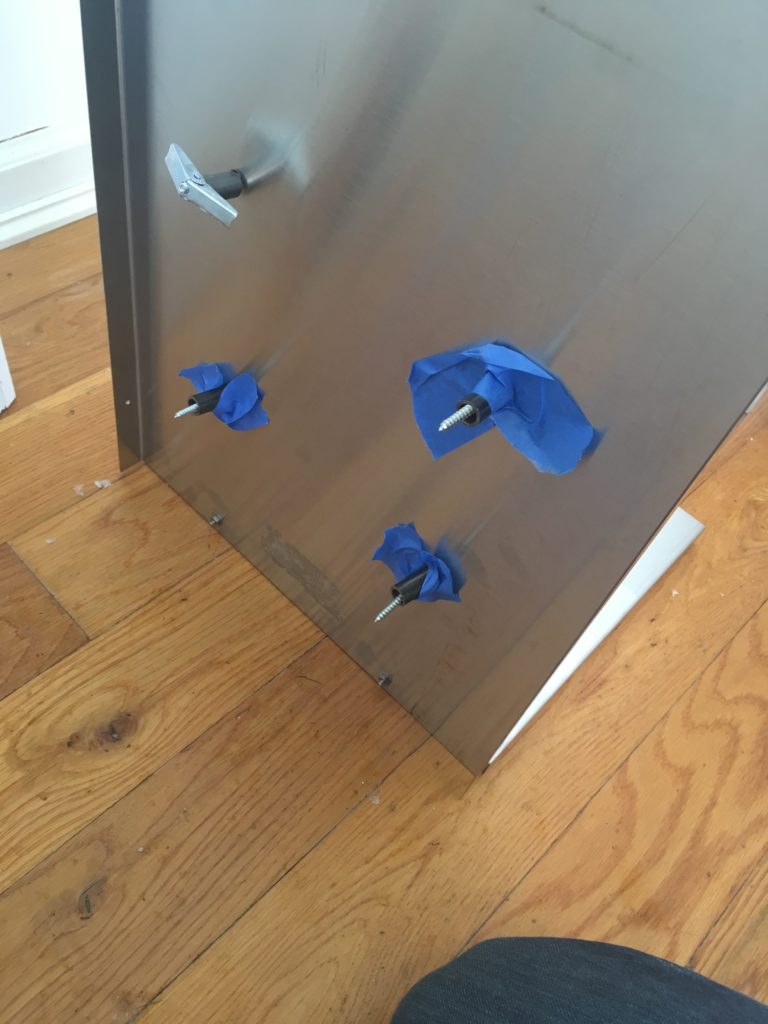
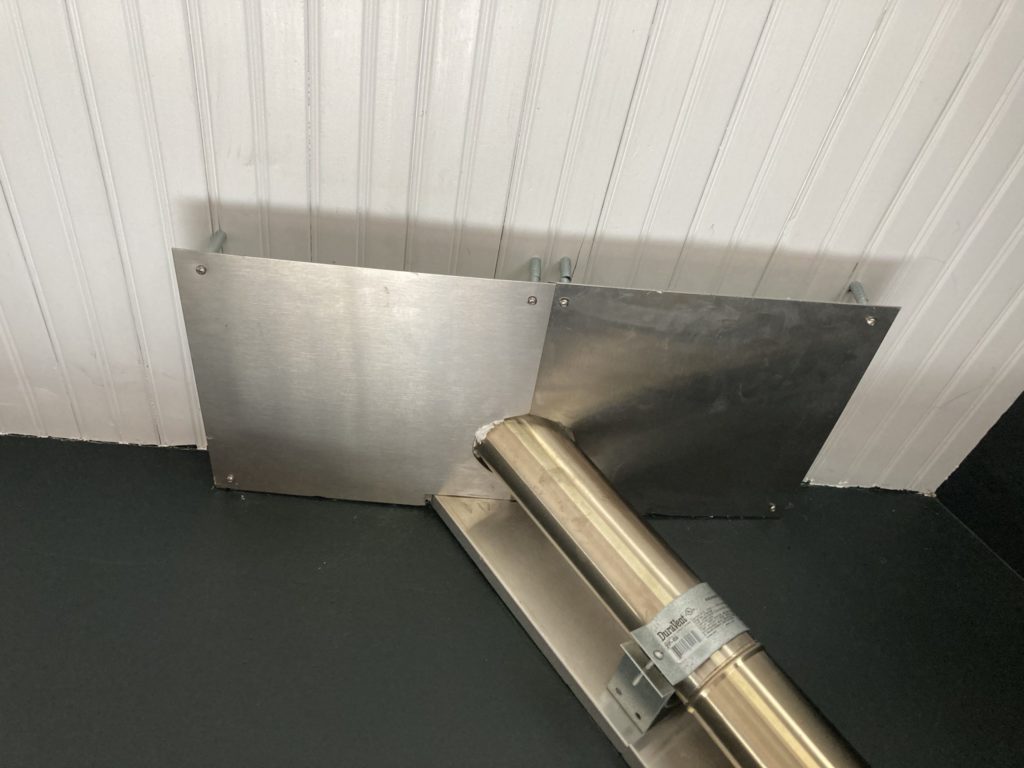
The final step, which I took care of a few days later, was making and installing a trim plate to cover up the stove pipe exit hole. Cubic Mini now sells these on their website, but I made mine from two stainless steel sheets that I bought on Amazon. As suggested by the Cubic Mini guys, I cut semi circles into the two pieces and then overlapped them around the stove pipe. The trim plate was installed with spacers and screws and does a fine job of hiding the stove pipe exit hole. I also added a bracket to the pipe to help keep it locked in place.
In a future post I’ll share my experience using the Cubic Mini. I hope this post was helpful for anyone considering installing a tiny wood stove. If you take the time to research and understand the process to achieve a safe installation it is well within the ability of most people. Just plan to do this work some time other than winter if at all possible.
Leave a Reply
You must be logged in to post a comment.