When you live in a 1200 square foot house, you really need to make efficient use of space. Where some homes have palatial entry ways featuring closets and coat racks and storage galore, our 1850 farmhouse enters right into the kitchen with no logical place to deposit shoes and a handful of hooks that we added via a classic Shaker peg rail. This system is woefully inadequate and we’ve schemed about options for retrofitting a modest actual entry way to the exterior of the house. That would be a big project necessitating permitting and a zoning variance, and almost certainly an architect’s design to appease the aforementioned town officials.
Our back door, on the other hand, screams opportunity. There is a little ~36″ wide by ~6″ deep nook of sorts right by the door to our back deck, perfect for a little shoe bench to manage the various items of footwear that a household of 4 needs to navigate the highly variable New England weather. This is one of those projects that had been on the “to do” list forever and when I finally got around to it, I had to ask myself why didn’t I just take an afternoon and get this done years ago. There really isn’t much to it.
First, I removed the baseboards, which I would later reinstall after cutting to fit the built-in bench. Removing baseboards is very simple. I’ve done it a bunch of times and anyone can easily do it. Use a utility knife to sever the top of the baseboard from the wall. Just work the tip of the knife into the space between the wall and the trim and then pull your blade along the length of the trim, which will allow you to both slip a pry bar behind the trim and prevent inadvertently pulling a layer of wall paint off when you pry the trim off. Once you’ve freed the top of the baseboard from the wall, work your pry bar in behind the trim and gently pry, working along the length of the board prying every few inches until the trim starts to pull away from the wall. Applying pressure next to the nails holding the trim to the wall will make quick work of removing the trim without breaking it.
With the baseboard removed, I cut to size and then tacked up some bead board that I had left over from an earlier project. The bead board isn’t featured prominently, and could easily be omitted, but it was also no big deal to include it as an extra finish detail since I had it on hand.

I had to give this next step some deliberation. I knew that I wanted the base of the bench to stand proud of the baseboard on the adjacent wall (bottom left in the photo below). I could have used some thicker wood and notched out a groove for the shelf. That is how I would approach building a similar bench that was free-standing, but this built-in lent itself to a little different design. I had some solid fir scrap that I “reclaimed” when I ripped the window stool in our master bedroom down in width when building a built-in day bed. This was inch thick and – being solid wood – seemed like it would provide proper “legs” for the bench top. The idea here is to hide these structural pieces behind some 3/4″ trim with a shelf resting on the bottom trim pieces with more trim running up to the bottom of the bench top. I cut the 1 inch fir down to length and fastened to the wall using construction adhesive, screws and brad nails. Then I attached the two “lower” pieces of trim, cut the baseboard I had previously removed to length, and then reinstalled that with construction adhesive and brads. I hemmed and hawed a little bit about what to do with the baseboard on the right side of the bench. I thought it would look a little weird to wrap it around the “leg” and have it terminate into the baseboard against the back wall, so I ended up having it terminate sort of in the middle of the “leg.” I cut a sliver of a return instead of just cutting the end square, which goes a long way into giving a finished look when your trim doesn’t terminate into a wall.

Now would also be a good time to talk about bench geometry. Most benches are between 16 and 19 inches in height and 15 and 20 inches deep. I planned on adding a bench top that was 1 and 3/4″ thick. More on that rationale below. I wanted to leave as much height as possible for boots and other “tall” footwear, so I went with a 19 inch finished bench height. Depth decision-making was less straightforward. The depth of the little nook I was building into was only about 6 and 3/4 inches. So, I was faced with the option of either a very shallow bench depth or having the bench top protrude out beyond the nook some amount. I mocked up a ~6″ bench by resting a 1×6 on the bench legs and quickly ruled out that option. Practically speaking, that is just too small for all but the very tiniest of tooshies. I deliberated a bit on the optimal bench depth given the space considerations, both functional and aesthetic. I was concerned that going with a “standard” depth of at least 15 inches would make for awkwardness on both accounts. The bench top would have to cantilever out past the right “leg” and the larger the cantilever the less stable the top would be. I also felt it might look out of balance even if the structural consideration could be addressed.
Lacking a real plan here, I decided to go rummage in my barn to see if there was any lumber that “spoke” to me. I was initially thinking I would construct the top from plywood and then add edge binding and paint. However, I had a very nice cutoff from replacing a stair tread a year or so ago. It was about 40 inches long and I needed about 36. I had been thinking it would someday be used to replace a future stair tread, but it occurred to me that it would also make a very nice bench top and was probably about the right depth. It was bull-nosed, and solid wood, and could be easily stained to match some of the other natural wood finishes in the room. I’m all for using whatever you have on hand, where appropriate, instead of buying something new and this seemed like a perfectly good/great option. So, I decided to go with the stair tread as a bench top and let that dictate my finished depth. At 11 1/4″ inches, I was still feeling like it wasn’t quite where I wanted to be, so I added a bit of 3/4″ trim to the back of the bench as a way to both give the bench a more finished look and pad the depth a bit.

This next photo shows the in interim steps between the finished bench and the “leg framing.” I had to rip a bit off a 1×8 so that the lower shelf and the trim would be the correct depth of about 6 3/4″. There are four different pieces of trim that “sandwich” the ends of the lower shelf. The shelf only supports the weight of shoes, so 3/4″ thick finger jointed trim is fine despite the 36″ span.
The bench top, on the other hand, would need to support a lot more weight. I consulted one of the many span tables on the internet to get a sense of what I would need to do to handle the weight of two people sitting on the bench. The stair tread I was using as a bench top is 1 inch fir. It could probably handle the 36 inch span without additional support, but I wanted to play it safe and give some extra rigidity to the installation by adding a layer of 3/4″ plywood underneath the top. This had the added benefit of making for a cleaner, no visible fasteners finish. So, I cut a plywood panel down to size, allowing for some overhang of the fir top. This was secured to the legs with with screws. I then added a piece of trim (actually two pieces joined with a scarf joint to use up some scrap) to the back. This added an extra 3/4″ of depth to the bench top and I also, I think, improved the overall look of the finished bench.

Next I cut down my fir stair tread to size. I wanted the part of the top that would extend out of the little nook to wrap around the corner a bit. So, I cross cut to ~37 inches and then set up table saw to rip about an inch off the back 6 inches. I carefully marked the cut, which I was going to do with the top upside down on the table saw for reasons that I can’t remember now. I stupidly forgot that the saw blade would cut past my mark, because, well, it is a circular blade. Duh. So, when I flipped the work over, to my dismay, I had an unsightly gash in the top that needed to be repaired. I took a little sliver of scrap to fill the gap, then some wood glue and sawdust, and after sanding and rounding over the edge it is hardly noticeable.


I had intended on rounding over this edge to match the bull nose on the front of the top, so I was able to get this patch to blend in without too much headache. Then I stained it with General Finished Black Cherry, to match the stain on the doors in the room, and then secured the top to the plywood by screws from underneath going up through the plywood layer and into the bench top about 3/4 of an inch.
The last step on the bench was some trim and then painting. Plywood edges look absolutely terrible without some sort of edge treatment. I don’t recall exactly what I did here but I probably ripped a 1/4″ edge band from the same 1×8 board that I had previously used to trim out the legs and add the bottom shelf. I also added some nosing for the bottom shelf that I created by ripping an astragal profile in half. Then using a jig saw, I cut the little curved bench supports on each leg. Those are strictly decorative and don’t serve a structural purpose. I also added a few bits of trim in other places that probably weren’t worth the time since they are not very visible. These were all attached with construction adhesive and brads.

With the trim installed, I caulked, primed and then painted. If I was more patient, I would have spent a bit more time on the legs. Ideally, the trim and the 1″ stock I used to build the legs would be seamlessly disguised to look like a single piece of wood. But I wasn’t totally precise with measurements or cutting and the edge isn’t perfectly flush. I thought some caulk would be enough to conceal but you can still see a faint line between the two. Some additional sanding and finishing would have completely done the job, but I called it good enough and was ready to move on to a new project.
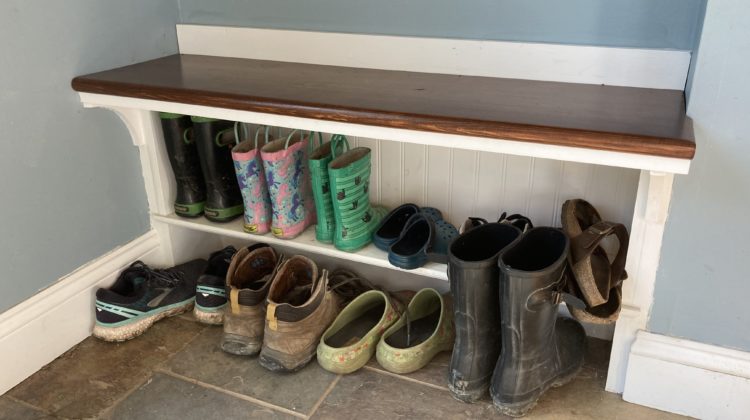
I thought it turned out quite well. I started this project late afternoon one day and finished it the next morning, perhaps 6 hours of total active time.
This was just the first (bottom) half of this entryway project. The upper half is discussed in this post about making a Shaker peg rail with shelf.

[…] Did I mention how much I dislike finishing? I’ll probably live with this awful stain job and the slop on the walls for weeks if not months, but will eventually truly and actually be done with this project. Here is what the whole entryway looks like now. The bench build is discussed in this post. […]