Sometime in between my last post in March 2022 and this most recent one, I built a 16′ x 8′ addition on our house. That is to say, I was one of several people involved in building the addition and ultimately did most of the work once the foundation and framing was done. I took lots of pictures along the way – and it has been a long way indeed – and some day I’ll empty out onto a digital page whatever thoughts of this project very expensive, very time consuming project remain in my brain. But for now I will start at the end (well, near the end as there are other items still remaining to be finished beyond this one) and tell the somewhat bounded story of how to build a shed (lean-to) roof using polycarbonate panels.
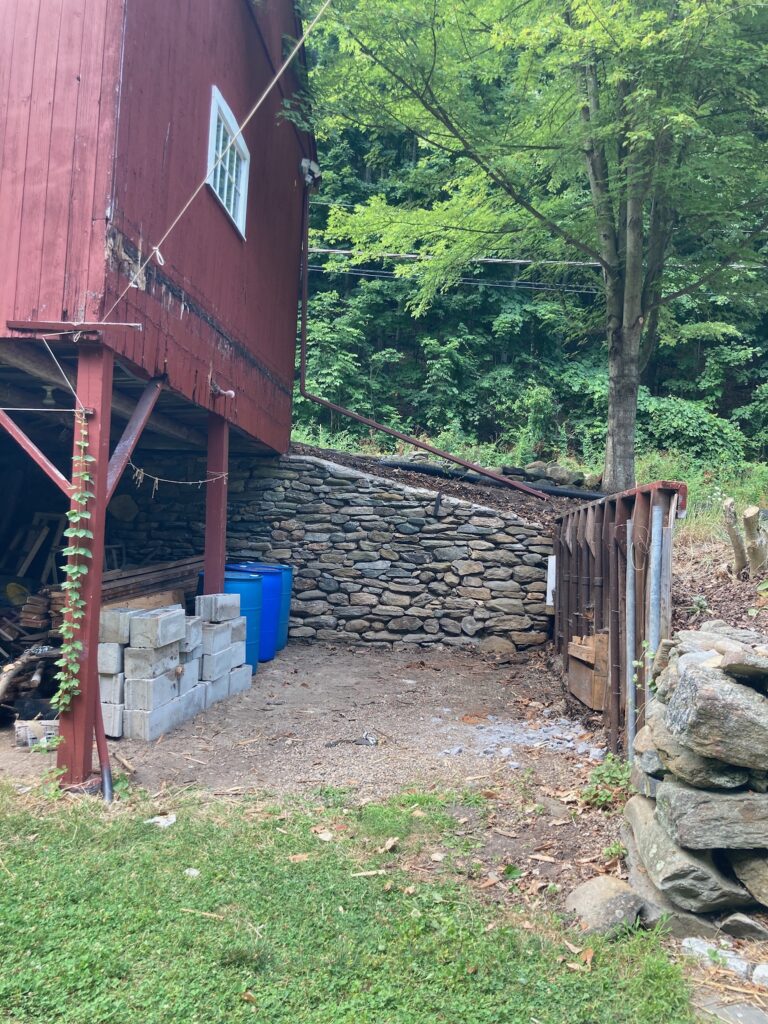
This story goes back to when we were purchasing our house in 2016. Although the 1850 farmhouse was in excellent condition, the English bank barn on the property had been neglected. The roof had been allowed to deteriorate to the point that a few gaping holes offered a clear view to the sky. And lacking gutters and proper drainage, the siding near near the ground had rotted away to nothing. The property was a former dairy farm and the original barn had been added onto in the late 19th century, combining two timber frame structures together to form a single barn. At a much more recent time, my estimate is the mid-1980s, a lean-to roof was built off the side of the barn, presumably to create some additional storage space. The barn (as the term “bank barn” would imply) is built into the graded. And the beam on which the lean-to rafters rested was built on top of a poorly constructed plywood retaining wall. Bot surprisingly, by the time we purchased the home, the wall had already begun to fail. At a few points along the bottom of the wall the wood had completely disintegrated and the drainage stone (pea gravel, a poor choice) was leaking out. I’m sure I have some more detailed pictures of this somewhere, but let’s skip ahead to the resolution with just a single photo showing the location of this project and the failed retaining wall.
In this pic, the existing asphalt shingled roof has been removed shortly before demolition of the retaining wall. You can see where the ridge board had been attached to the barn siding with some sort of mastic as a flashing. I kept the 2×6 rafters with the intention of reusing them when building the new roof. Some plywood and other wood members had been used to temporarily repair the rot on the retaining wall. I had also stacked two courses of cinderblock against the wall as an additional temporary measure thinking that the blocks would be used to build a proper retaining wall.
In fact, one of the first things we did after buying the house was get some bids from masons to build a new wall. However, when I went to pull the building permit for the wall I was informed that any retaining wall in the state of Connecticut over 3′ high requires a structural engineer. So, this is starting to sound expensive, but I get an engineer to have a look and he shows up in his shiny Mercedes and tells me that he can’t let me reuse the existing concrete footer, so we’re going to need to demo the existing one, excavate to frost depth, and pour a new footer. At this point, we’re looking at $10K for just demo work and a new retaining wall and I’m starting to regret ever talking to the town’s building official since it sure seems like a block wall on the existing footing would have been just fine with the proper drainage.
At any rate, we dragged our feet on the project and the years passed by. Then, we decided to put an addition on the house and with demolition, excavation and concrete work needed for the project we simply rolled the retaining wall into the scope of work and saved a couple grand over doing it as a standalone project.
So, the wood retaining wall was demoed and a trench was excavated to frost depth…
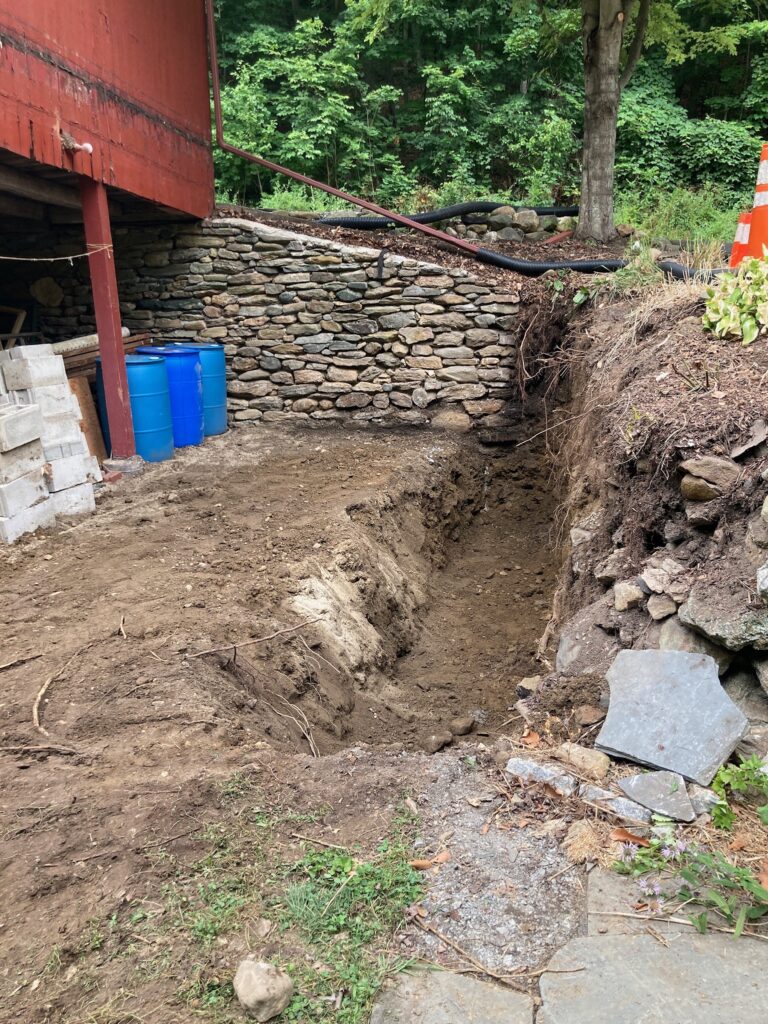
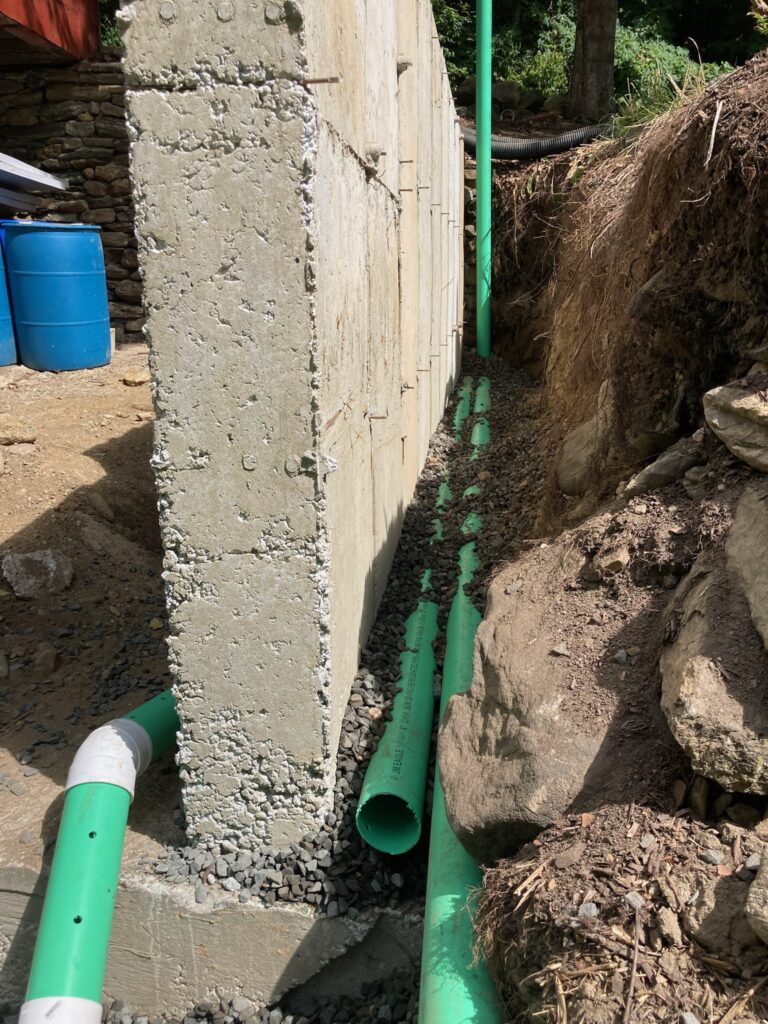
A footing was poured and then a week or so later the retaining wall…
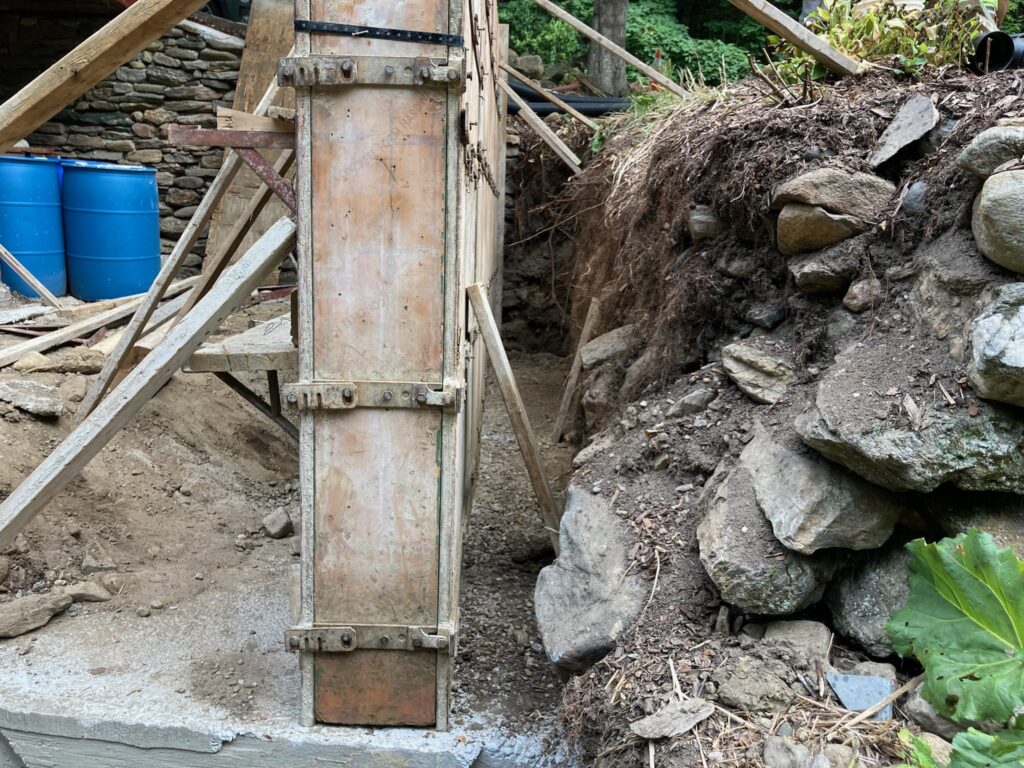
…which was backfilled with drainage gravel and pipe…
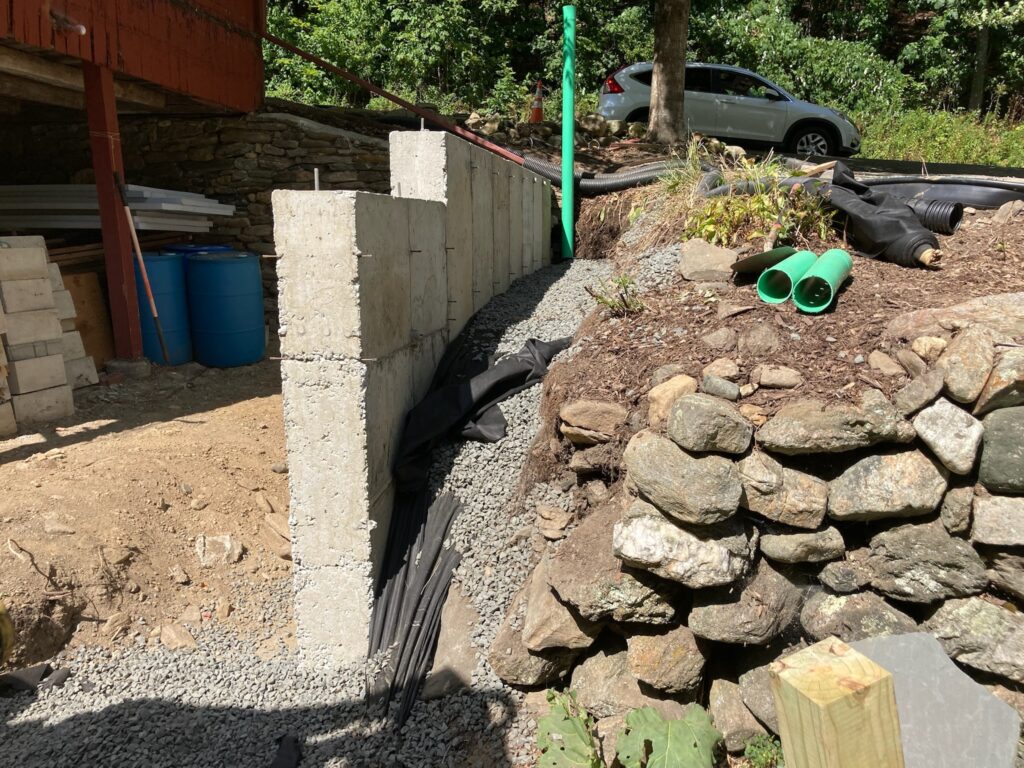
With the new wall in place, my attention turned to the much higher priority of getting our house back into livable condition and there existed, much to the chagrin of my wife, an unfinished pit of sorts for the next 12 months.
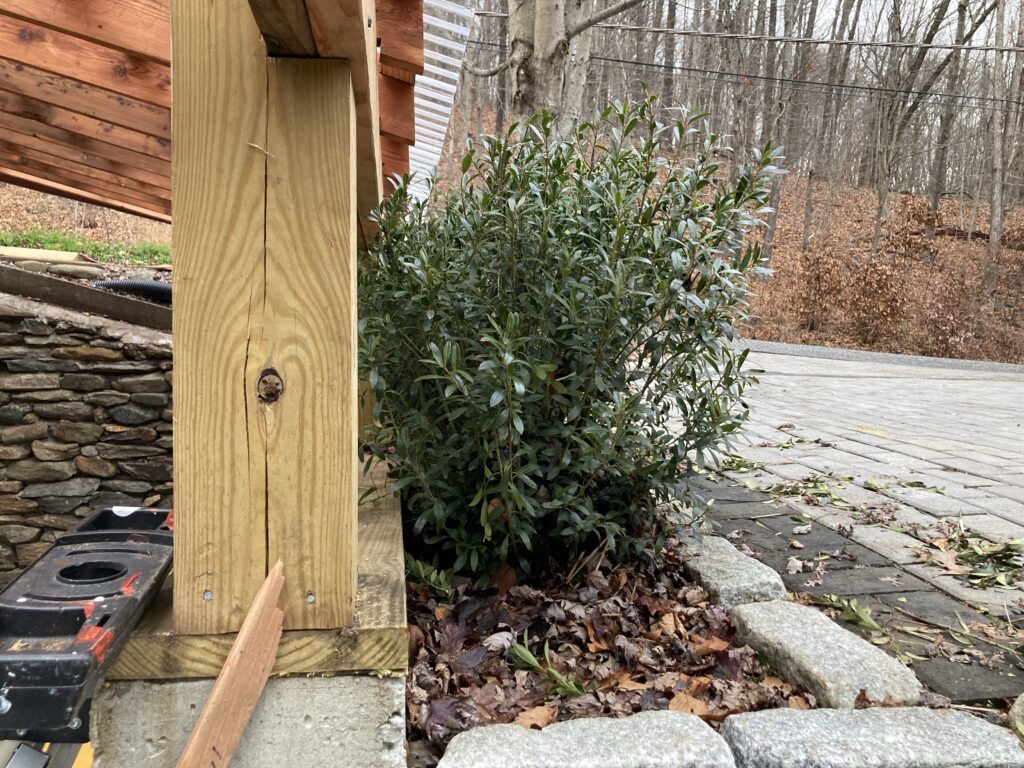
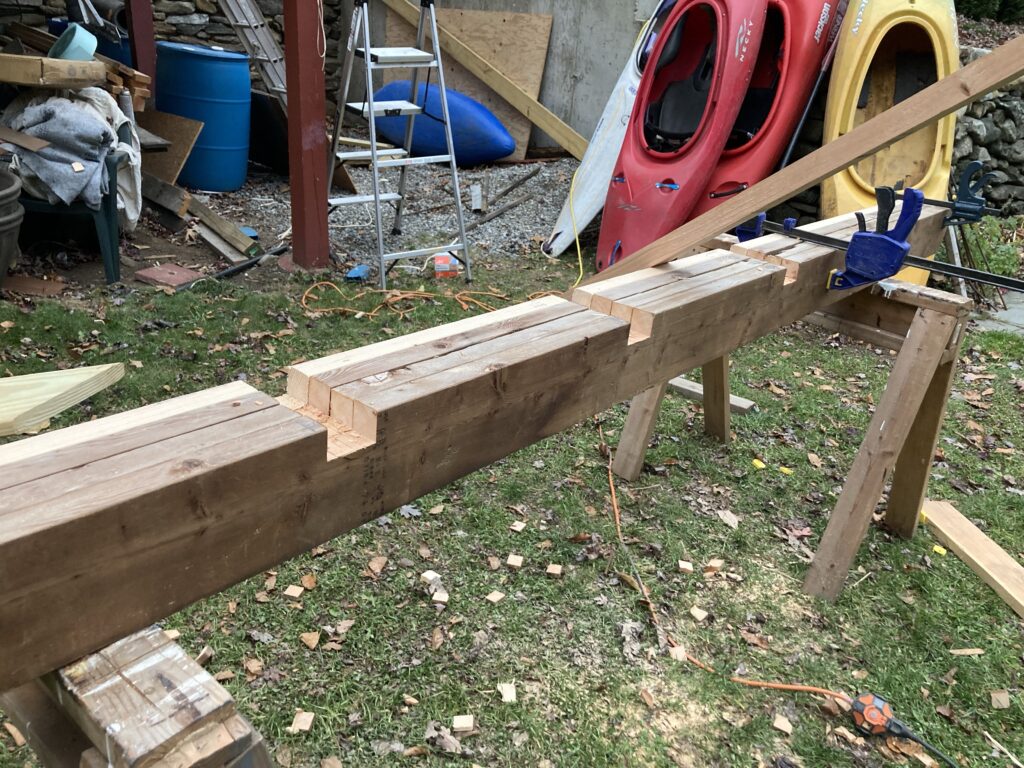
I spent an afternoon in early fall working on the beam that would support the roof rafters. I wanted a 4:12 slope (at least) so I worked out the finished height of the beam with plans to pick up the ridge side of the roof a couple of feet from where it had been previously so that there would be some additional vertical space under the finished roof. We also had planted to some inkberry holly along the edge of the driveway, which would be right at the eave of the roof and I wanted to make sure the landscaping wouldn’t encroach too much into the roof. This is certainly not a typical consideration for a roofing project. How often does one need to consider whether the mature height of their shrubs will interfere with their roof. This ended up being a little tighter than optimal. I could have picked everything up another 8 inches or so and wish I had, but I happened to have just the right amount of 6×6 material on hand to frame out the roof at the dimensions I did, so I went with it thinking 8 inches wasn’t enough to make a meaningful difference, but that extra height would have been nice.
You can see here just how tight this is and I have some concerns that I’m going to be dealing with the potential for wood rot due to the close proximity of the landscaping to the wood framing. A gutter will hopefully negate this concern.
I decided to frame this kind of like a deck beam, with a cantilever over the end posts…
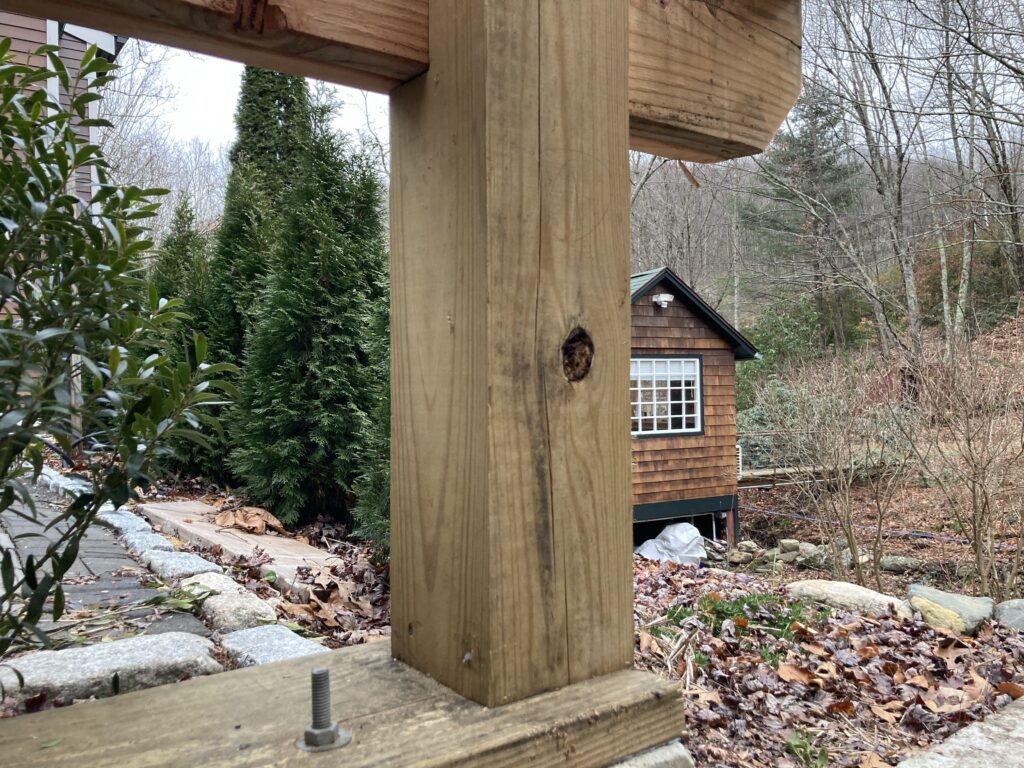
My guess is that this isn’t all that typical but it made sense to me based on the circumstances. I also wasn’t sure if using a sill plate was the right way to go, but I used that approach based on the recommendation of the framing carpenter who helped me with the house addition. The alternative would have been post stand offs for the four posts supporting the beam. There is sill seal under the plate and the roof will keep the water off of it, so I suppose it should last a really long time but my intuition is that it will eventually need to be replaced. Is that in a hundred years? Fifty? Hopefully not much less than that.
This part of the project was dead simple once I knew my measurements. I checked for square, plumb, and level and had it in place within a few hours. And then I turned my attention to the ridge side.
The previous roof had been installed directly against the siding. This struck me as wrong although I have to concede it didn’t leak or show any signs of failure. But I wanted to remove the siding so I could install flashing and some additional framing to attach my ledger. I’m actually not sure if that is the correct term or not. Is it a ridge beam or a ledger board? I found surprisingly little information about lean-to/shed roofs when doing some research. And searching for the term “shed roof” invariably resulted in a lot of sheds with gable roofs. So I approached this part of the project the same way I would building a deck ledger, even though the loads would be a lot less since polycarbonate is very light compared to decking and the only live load on the roof would be snow.
I marked a line against the siding that was level with the eave side of the beam and at the correct elevation to achieve a 4:12 pitch, triple checked my calculations, and then used a circular saw to cut the siding and removed it. This is where things slowed down for a while with the project, because I discovered that there was significant rot in the barn beams that wasn’t visible until the siding was removed.
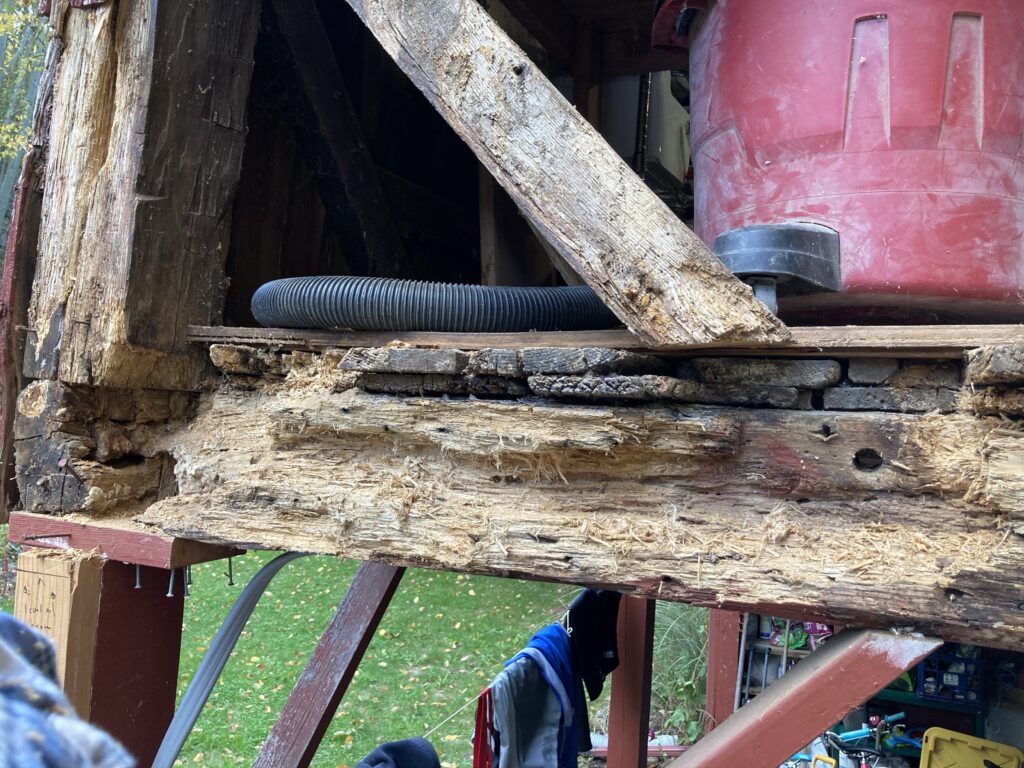
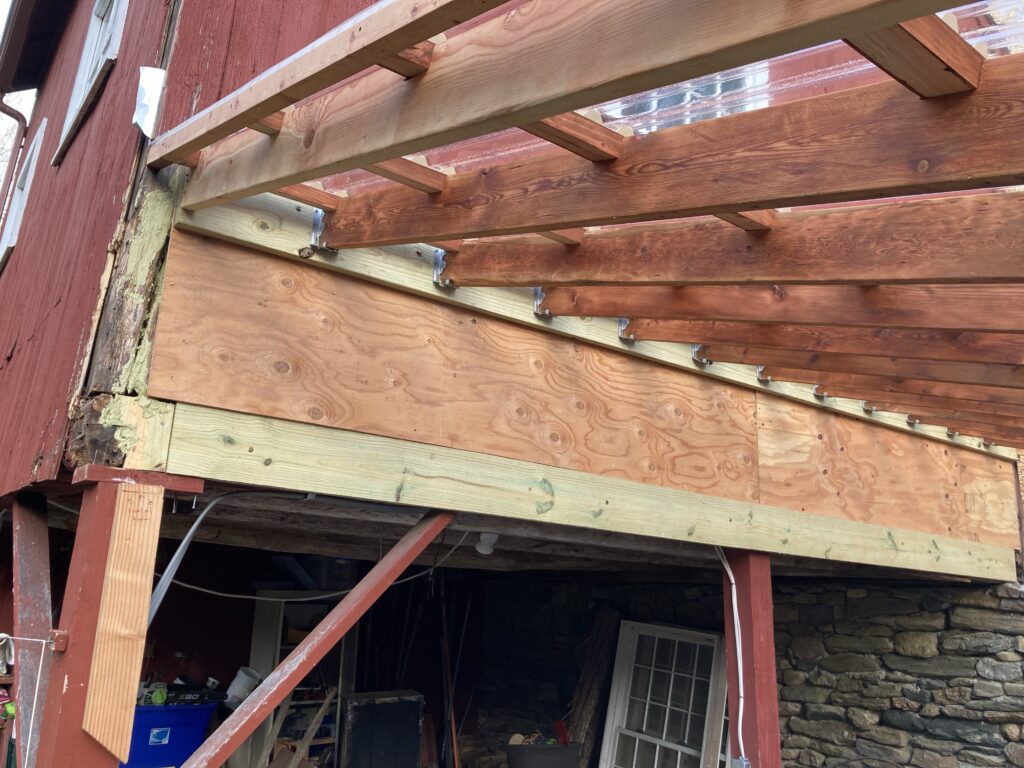
Yikes! This was the worst of it, but there was some additional serious rot on the other end of this beam as well. I don’t know whether this was the result of holes in the barn roof (since repaired) or the lack of gutters (since added) or some other reason, but obviously this needed attention. Using a combination of hand and power tools I removed as much of the dry rot as possible, sprayed on a wood hardener, and then layered in new sections of PT lumber filling some of the smaller cracks with bondo. I then sistered on a length of 2×8 for additional support. I also added some additional framing for both my ledger and the plywood sheathing to attach to. This is what it looks like currently, and I’ll eventually add siding and perhaps figure out a way to make that ledger board look more attractive.
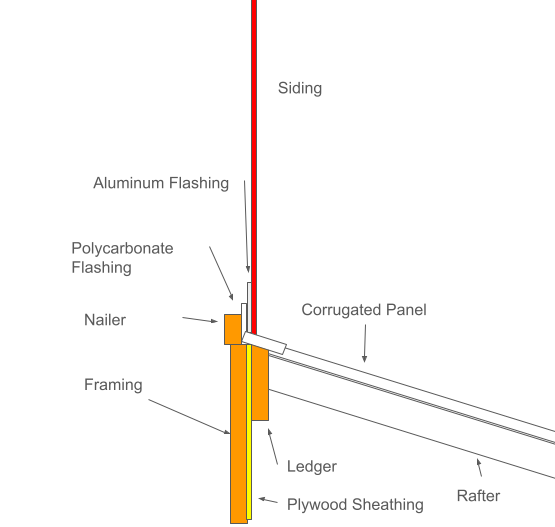
One of the trickiest parts of this project was the flashing. I was using the Suntuf polycarbonate panels made by Palram and sold through Home Depot. Palram sells a wall connector flashing which was a perfectly well made product but I wasn’t entirely sure how to install it behind vertical siding. I looked through the installation instructions and decided to counter flash against the inside of the siding with a role of 10″ aluminum and then tucked the clear polycarbonate flashing behind that. I had to notch the little tab at the top of the flashing to fit around the posts of the barn framing. I suppose that tab is there so that the flashing sits flush against the backside of beveled clapboard siding, but I honestly don’t know.
The other thing that is a bit funky with the flashing is that the corrugations make it so your siding can’t fully cover the part of the flashing that tucks behind the siding unless you were willing to scribe your siding to fit into those corrugations. So if you’re looking at the ridge side of the roof you’ll see straight through the flashing (since it is clear). It is a minor detail that I thought would bother me more than it does once installed, but if I had been more attentive during the project I could have painted the face of a 2×4 that I fastened to the back side of the flashing as a nailer. As mentioned previously, I added in some additional framing for the ledger board and the vertical siding of the barn, after it had been cut away, was just sort of dangling in mid-air, so this seemed like a prudent and relatively simple step except for the fact that my access to the backside of the barn siding wasn’t very good due to massive workbench spanning most of that wall and there was some electrical wire I needed to contend with, but this additional framing went in without too much headache. The entire assembly looks like this:
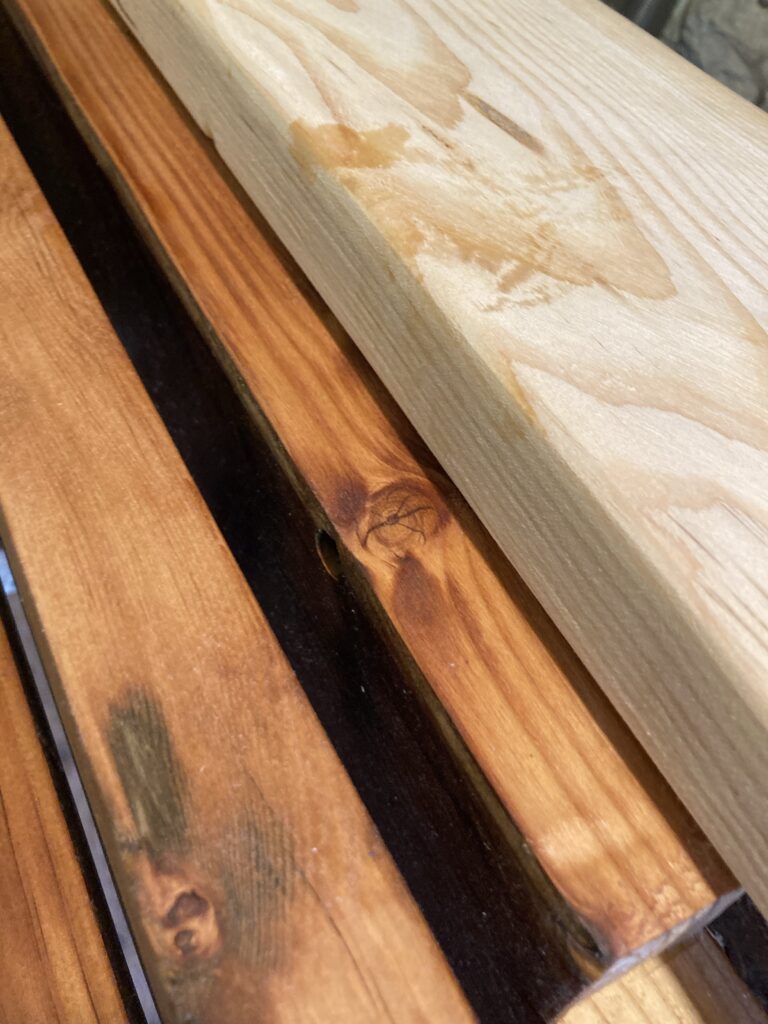
With the flashing installed, I solicited some assistance from my wife in getting the sheathing and ledger board up and then cut a rafter to test fit. I was reusing the rafters from the roof that had been torn down and this added substantial time to the project. But I wanted to reuse them to a) save a couple hundred bucks on materials b) remain true to my environmental ethos and c) take advantage of the much tighter grain of the old wood, with this latter point being the most compelling.
Look at the difference in the old growth Douglas Fir with a coat of Danish oil rubbed in!
Since I needed 9 foot rafters and then salvaged ones were 10, it was pretty straightforward to cut of each end and start from scratch, except for all the nail heads from previous roof deck. I pulled as many of those as I could (and cut or sank any that I couldn’t easily pull) and then made the decision that I would sand all four faces of the rafters since they would be visible in the installation. (This little roof is right next to our parking area by the house, so it is actually a rather prominent feature and something we look at every single day. The rafters were pretty rough with a gray patina and a few had been painted red to match the barn. My wife helped with some of the sanding. At some point, my cheap belt sander, that had been given to me for free a few years back, died. So I went out and bought a new Ridgid from Home Depot, which I don’t love (unlike most every other Ridgid tool I own). I think I went 60 grit to 80 and then 120 on a few of the boards, but eventually just used i80 as the finish grit because we’re talking hours upon hours of sanding here and I decided the 80 grit looked more than good with some Danish oil on it. I filled my shop vac with wood dust making these rafters look good, and they do like pretty damn good, so I suppose it was worth the extra time. I really don’t know exactly how much time, but it was probably close to 10 hours total on all the finishing, with most of that being sanding since applying the varnish goes quick.
At some point, either before or after sanding (I don’t recall which), I had to notch the top of each rafter to accommodate the purlins. The installation instructions call for 2×3 purlins (which run perpendicular to the rafters) every 24″. These can either rest on top of the rafters (easy) or be “integrated” for a seamless look. This requires notching the rafters, which is pretty straightforward but did add some time. I determined the correct placement for the purlins on one rafter and then used that as a template, marking and notching four of five rafters at a time with a circular saw by kerfing and then knocking out with a hammer. I used a chisel and oscillating tool to clean up the cuts.
I made the purlins from 2x4s with a 1/2″ ripped off either side, which I think works better than off the shelf 2x3s, which are notoriously low quality and also have a rounded edge where as my purlins would theoretically sit perfectly flush with the rafter. In actuality, I didn’t always hit the correct depth with my notching and a couple of the purlins sit an 1/8″ proud of the rafter. It’s not really noticeable unless looking really, really closely.
The bigger “issue” with the purlins was getting them to “match” the rafters. The reclaimed doug fir rafters have this beautiful red hue when finished, but the 2x4s, while also doug fir, have the almost orangey-yellow of a typical 2×4. I was at a bit of a loss for how to deal with this and tried a few things, including adding some tint to the same clear Danish oil I used on the rafters, but it just didn’t get me anywhere close to what I wanted. Then I remembered that we have beautifully finished interior doors made from fir that are stained with General Finishes black cherry, which really brings out the red in the wood. So I tried that on the purlins, with wood conditioner to help even out the stain. This worked quite well as can be seen in some of the photos.
With all the little finishing details figured out, I was able to get the rafters up in just a couple of hours. I made a last minute decision to use Simpson rafter ties instead of simply toe-nailing. I’m not sure what I was thinking. I wish I had just toe nailed since it didn’t save me any time aside from making it easier to do as a one-person job. I suppose there was some part of my subconscious that wanted to over engineer this since it is such an unusual installation (being a polycarbonate roof and the whole ledger board on a timber frame which I’m sure has been done before but I couldn’t find any info on). Installing the purlins proved to be the more finicky part of the job.
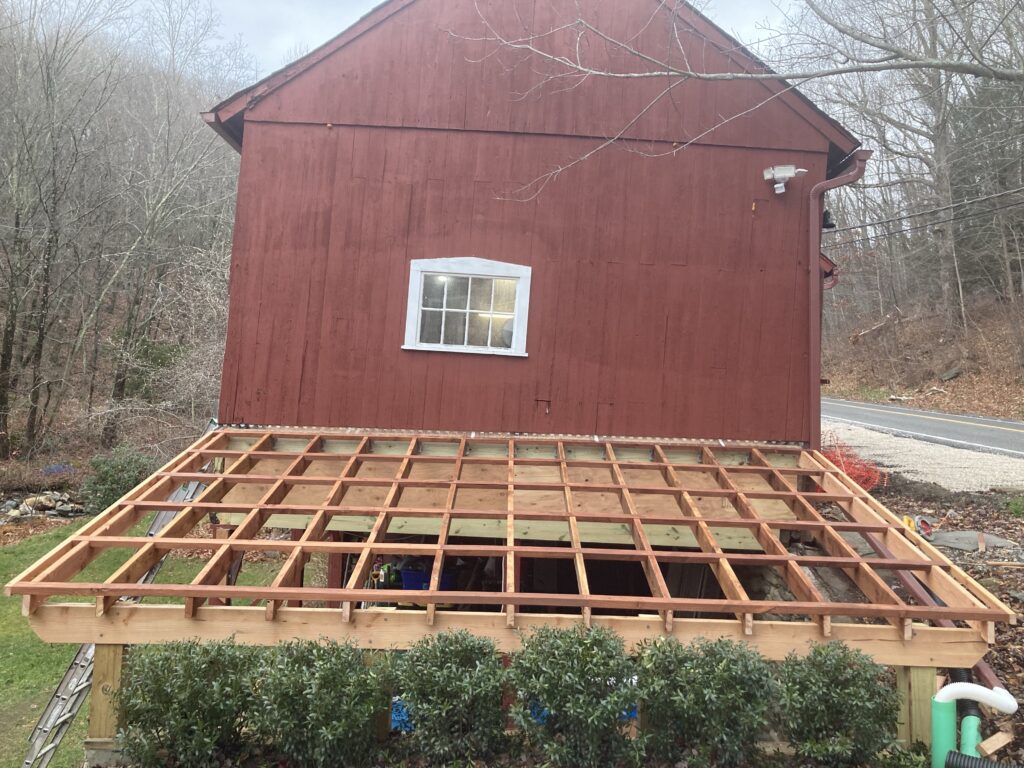
First, I had to account for the correct rake distance to make sure the sides of the roof lined up with the corrugation spacing of the panels and also to make sure the roof width matched the width of the building. I had planned all along to extend the purlins out from the side of the outer rafters so I figured out what that distance was and then subtracted the 1.5″ width of the board that would attach to the purlins to form the rake.
I also needed to make sure that the end of each purlin landed in the middle of a rafter. Since I notched the rafters to be exactly the width of the purlins, some of them were a really tight fit, but some coaxing and (in a few cases) some in situ modifications to the notch, snugged everything up nice and tight. I considered using 16′ lumber lengths for the purlins but the total roof width was something like 16′ 8″ so it wouldn’t really make things any easier and would probably have made it more difficult since getting shorter lengths to fit into the notches was challenging enough. I ended up using three different sections of lumber for each of the purlins, using a ladder from below or sometimes crawling out on the structure to fasten each piece to a rafter using a framing nailer. There was quite a bit of going up and down ladders and pounding with a rubber mallet and what not to get all the purlins in place. And then the roof deck looked like this…
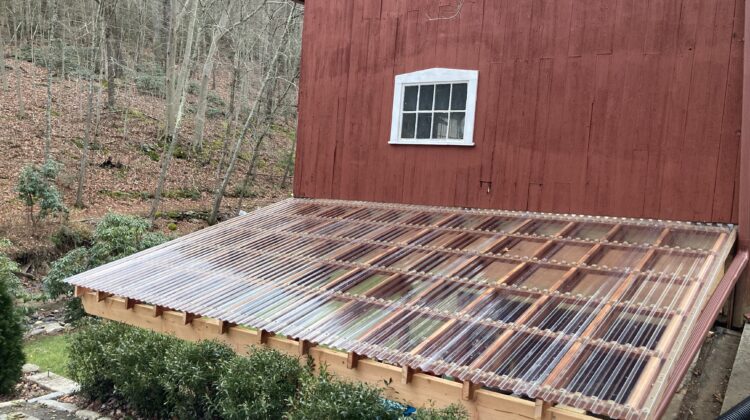
Next came the vertical closure strips, which are plastic pieces that get fastened to either side of the structure to form a tight barrier between the outer edge of the roof corrugations and the roof deck. Then the horizontal closure strips, which are plastic ribs matching the roof panel profile, and the actual polycarbonate panels get installed.I worked from one side of the roof to the other, making sure everything lined up properly. I would take a set of six closure strips, one for each purlin, and set those in place, then slide the panel over the closure strips, which would usually get displaced an inch or two in the process. The top end of the panel would need to be slid under the flashing, so there would be some fiddling to realign the closure strips and ensure everything was square before drilling a pilot hole through the panel at each of multiple screw holes in each purlin, and then finally driving the appropriate screw through the panel and the closure strip into the purlin. I don’t recall how many screws there are, but its a lot, and this takes real time. But eventually it was done with final result being this…
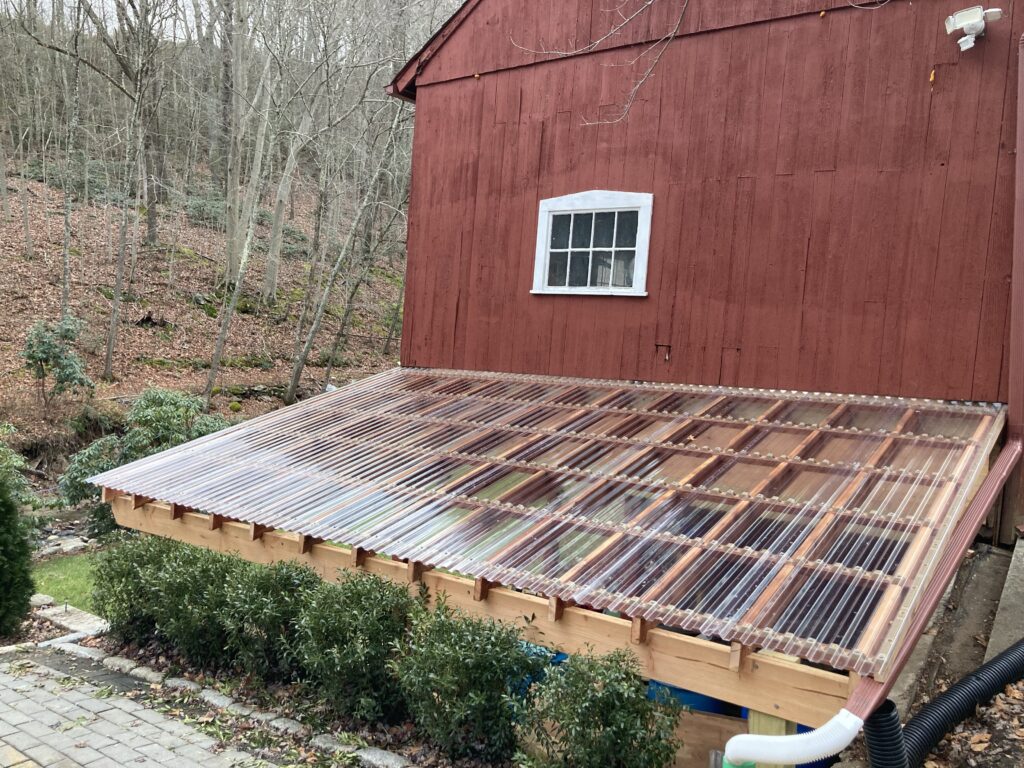
I was really happy with the way this project turned out. I still need to make some modifications to the downspout coming off the barn gutter, which for now is still functional but just sort of pushed off to the side by the roof. I also will probably end up putting in a gutter on the new roof. I’m planning on capturing stormwater in some rain barrels since the polycarbonate will result in much cleaner water than asphalt shingles. I also plan on eventually enclosing this whole area with some more clear polycarbonate so it can function as a greenhouse. But for now we’re just happy to have it finished and to be able to use the space underneath for storage.
One final thought on polycarbonate roofing panels: the installation manual suggests using a backwards circular saw blade to cut panels if you need to do so. I did need to trim about a foot off the end of each. panel. I was kind of dubious that this would work, but it was actually super clean and easy. Just don’t forget to switch your saw blade back before cutting any wood with it!
Leave a Reply
You must be logged in to post a comment.